FHB Logo Facebook LinkedIn Email Pinterest Twitter X Instagram Tiktok YouTube Plus Icon Close Icon Navigation Search Icon Navigation Search Icon Arrow Down Icon Video Guide Icon Article Guide Icon Modal Close Icon Guide Search Icon Skip to content
Subscribe
Log In
  • How-To
  • Design
  • Tools & Materials
  • Restoration
  • Videos
  • Blogs
  • Forum
  • Magazine
  • Members
  • FHB House
  • Podcast
Log In
How-To

Seating and Storage for Any Space

Solid plans, thoughtful prep, and smart assembly are the key elements to handsome and functional built-ins.

By Gary Striegler Issue 333 - August/September 2025

This article continues the step-by-step process of building custom built-ins, focusing on the window seat, upper shelves, and cabinet tops that connect the lower and upper units. It covers how to prep, assemble, and install the window seat with drawers and how to build and fit display shelves and cabinet tops with strong, clean joinery. Installation tips include positioning and fastening the base cabinets, seat, and upper cabinets for a seamless built-in look. The article also details finishing touches like crown molding and base trim to complete the installation.

Sit and Store

One of my clients really wanted a window seat for reading. But because the house didn’t have a bay or dormer window—classic spots for built-in seating—she couldn’t imagine a window seat working anywhere else. However, I’ve created the perfect spot for window seats in past projects by making a seating alcove between a pair of tall cabinets. It seemed like a possible solution in this case, so I proposed a pair of display cabinets with closed storage below and open shelving above. Between the cabinets, I’d install a window seat with three drawers.

When my client gave me the go-ahead, I was excited. Not only does the window seat offer valuable extra seating and add practical storage, but a cohesive built-in project like this can completely transform a space into something warm, inviting, and visually striking.

I wrote about the first part of this build in the previous issue (“Custom Built-ins With Job-Site Tools,” FHB #332). It shows how I built the shelf and base cabinets flanking the window seat with methods I use to make built-in cabinets for almost any space.

In this second article, I walk through the steps of building the cabinet tops that connect the upper and lower cabinets, as well as the shelves for the upper cabinets. I also break down the process of building the window seat, which is a basic short cabinet with a solid top and three drawers. Finally, I show how I prepped the space and installed the finished cabinets. These two articles show how to build and install cabinets in any space that needs extra storage or a comfortable spot to sit.

Planning a Window Seat

Almost any room with a window is a potential spot for a window seat. If the window is centered on the wall, I usually flank the seat with cabinets or open shelving for displaying books, art, and collectibles. If the window is off to one side, I build boxes or shelves of different widths on one or both sides of the window seat that complement the space. I usually bring my clients two or three ideas and work with them on the final design so the amount of display and storage suits their needs.

Most window seats are between 40 in. and 64 in. long, which is roughly the width of a single or twin window plus room for the window casing and stool. The seat and its alcove can be longer or shorter if the situation calls for it, but keep in mind that a smaller seat lacks the space for spreading out that makes a window seat inviting and comfortable, and a wider one lacks the coziness that makes someone want to spend time there.

I think built-in window seats look best and are most comfortable when the bench is 16 in. to 24 in. deep and 14 in. to 18 in. above the floor. I also think a window seat feels cozier when it’s more shallow than the cabinets on the ends, and nestled between them. I made this bench about 16 in. deep and 16 in. off the floor. When I’m working through a design, I ask clients to choose three inspiration photos to help me jump-start a design. Three is the magic number, as more photos tend to confuse the issue.

Plan for the Installation

As I mentioned in the first article, I built the tall cabinets in two parts so that they would be easier to assemble and to move to where they’d be installed. When planning any large built-in fixture or cabinet, it’s essential to make sure you can get the components from where they’re being built to their destination. Check door openings, stairway and ceiling heights, and the turning radius in stairs and hallways before you commit to a design. If tight spaces are a concern, consider making the assembly out of smaller cabinets so you can get the parts where they need to go.

Also, make sure you can stand up any cabinets that reach from floor to ceiling by taking diagonal measurements on the side of the cabinet box. The diagonal measurement from a top corner to the opposite bottom corner should be less than the ceiling height anywhere you’ll need to move boxes from a lying to a standing position.

Once I built all the parts for the cabinets and seat on this project, I test-fit everything in my shop. When I was convinced everything would go together correctly, I loaded all the parts into my trailer and headed to the job for the installation, which took only a few hours. Then I called in the painter to fill the fastener holes and to prime and paint the cabinets and seat.

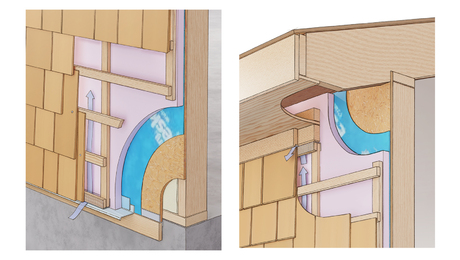
Build and Install the Tops

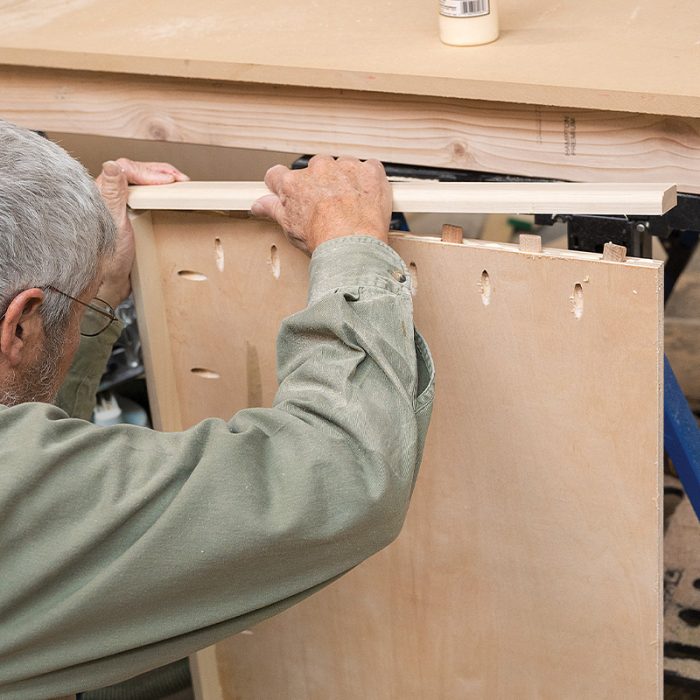
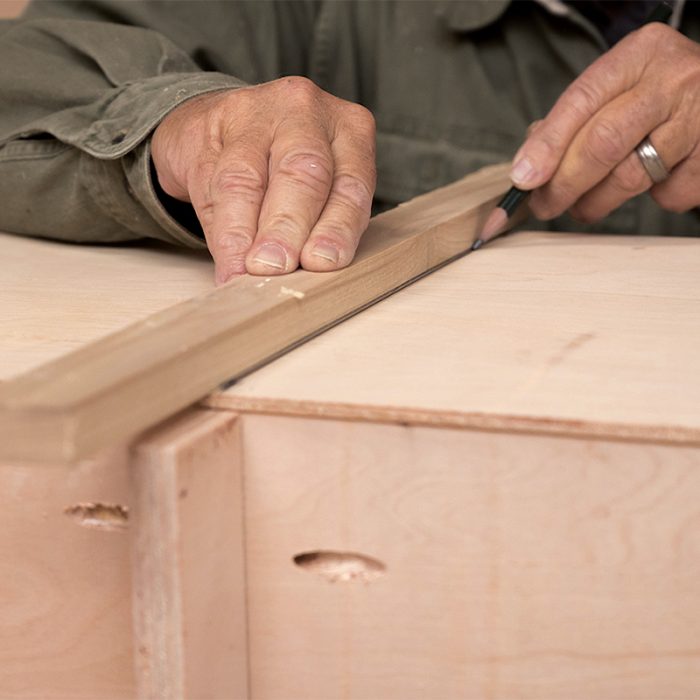
The base cabinets have 3/4-in.-thick plywood tops that also form the bottoms of the upper bookshelf cabinets. The tops have nosing made from poplar stock that hides the plywood core. I cut the plywood panels with a track saw and install the nosing on the fronts and the sides that face the window seat. The tops are installed flush at the back and sides where the cabinet meets the wall. I’m careful to cut and install the nosing so there’s both a left and a right top.

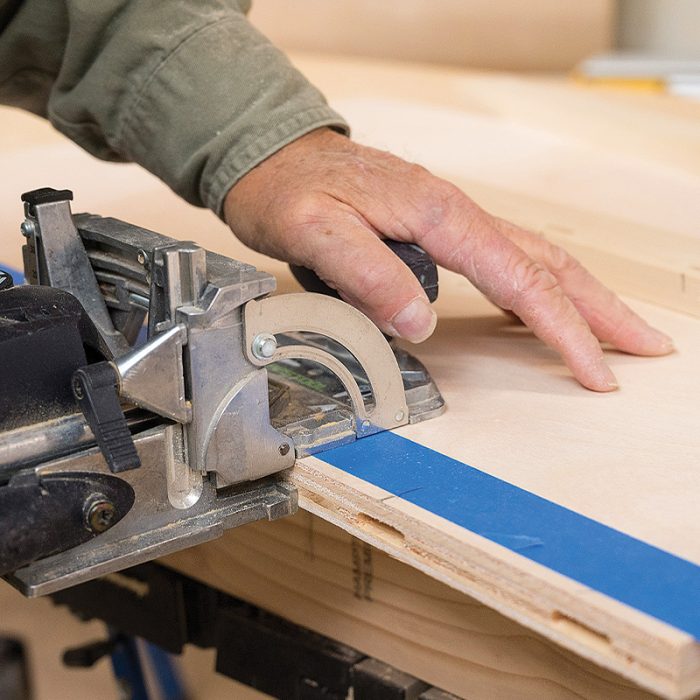
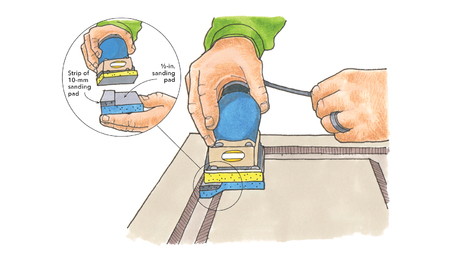
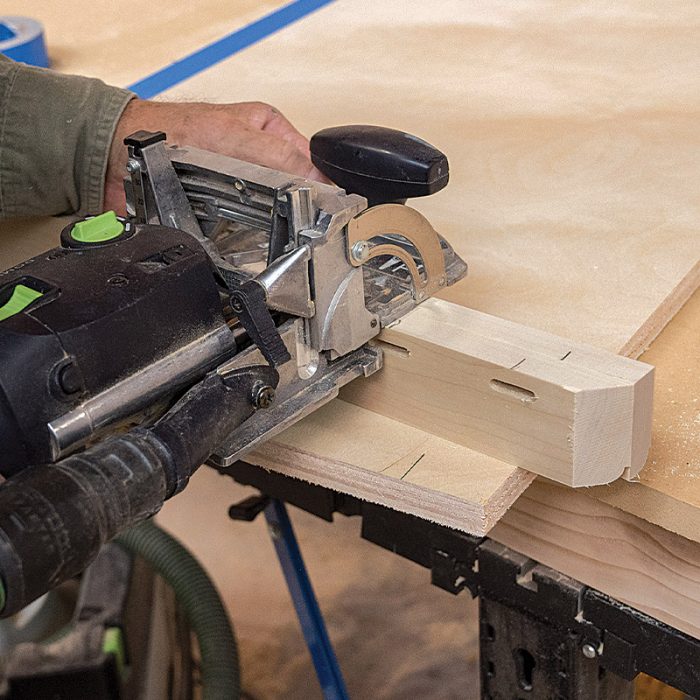
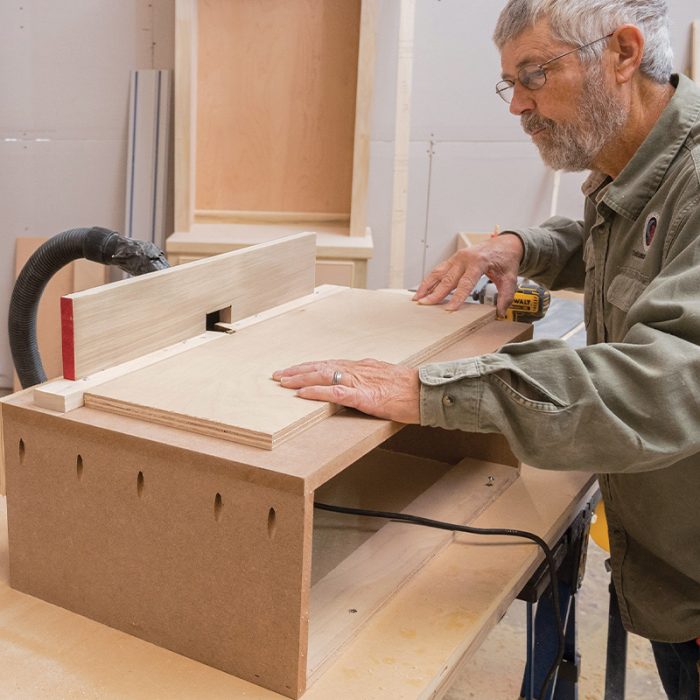
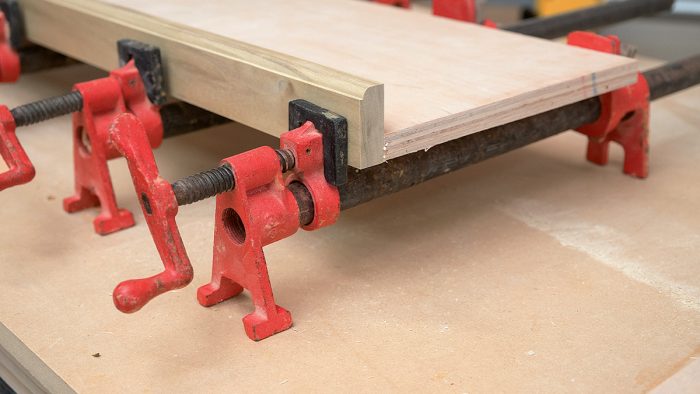
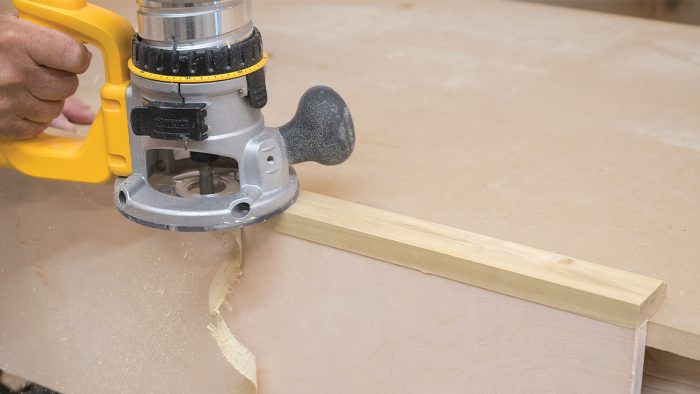
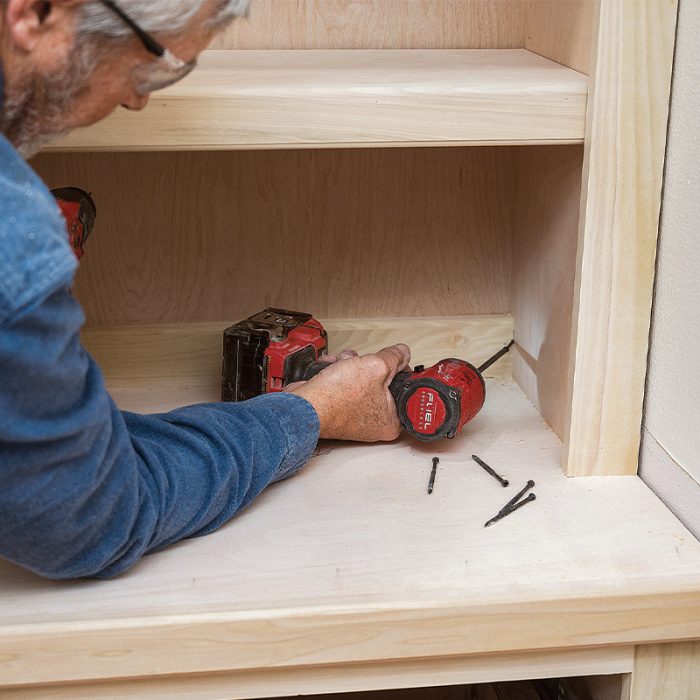
Cut the Tops and Fit the Nosing: I cut the plywood tops 1/4 in. wider and 1/4 in. deeper than the base cabinet and then fit the nosing, starting with the front. I add two layers of tape to the plywood to raise the Domino joiner slightly. This places the nosing slightly proud of the plywood so I can sand it flush later.

Make a Strong, Tight Fit: I apply glue to the plywood and loose tenons before attaching the nosing. For a strong, tight glue joint I alternate between loose tenons for strength and pocket screws to draw the joint together and clamp the assembly while the glue sets.

Ease the Edge: Once the glue that secures the nosing has dried for an hour or two, I sand it flush with the plywood top and then ease the edge with a 1/4-in. roundover bit.
Fasten the Top: For the initial assembly, I screw the plywood top to the bottom of the upper cabinet, making sure to install the wall-side flush. The upper and base cabinets are left separate until installation, which makes delivery and moving the cabinets around the job site far easier.

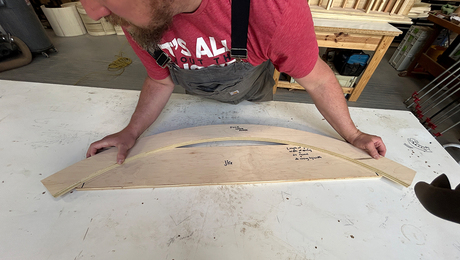
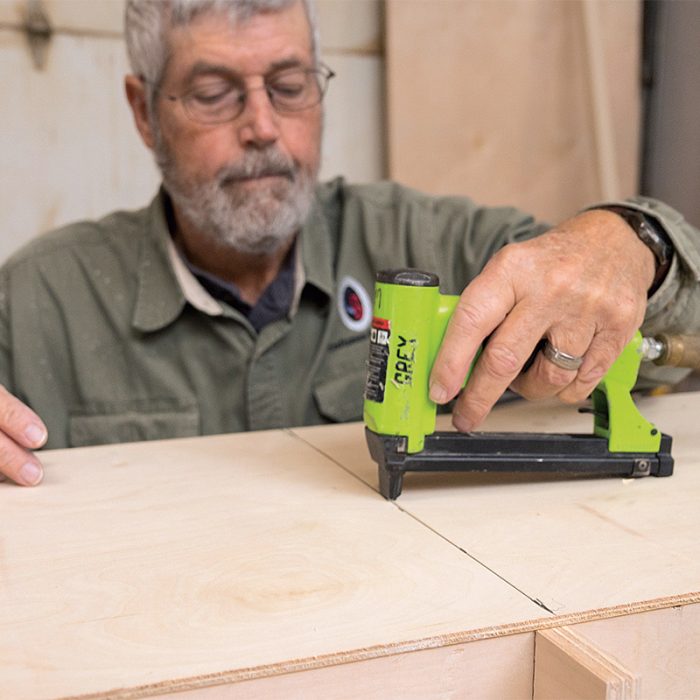
Make Display Shelves

For bookcases and display shelves, I make one shelf per vertical foot, but I keep the shelves adjustable so clients can also display tall books or collectibles. Shelves should be about 3/16 in. shorter in length and depth than the inside dimensions of the cabinet so they can be easily installed and repositioned.

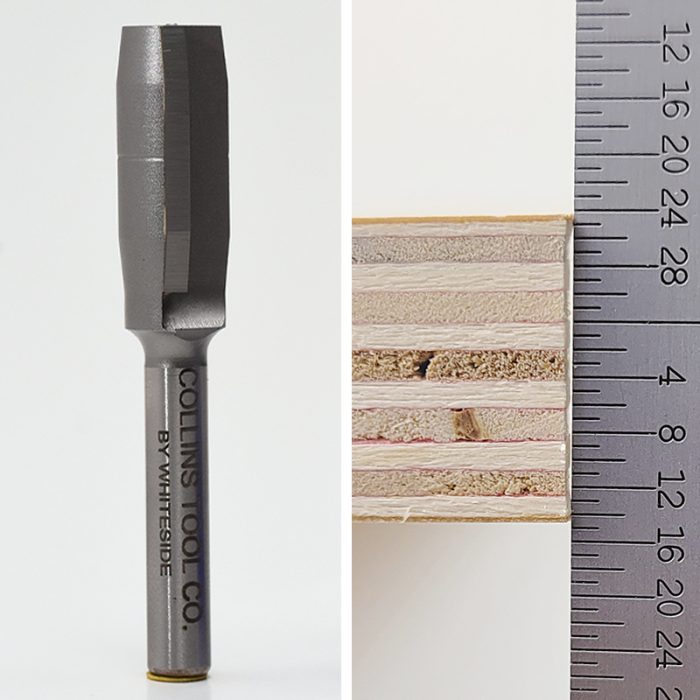
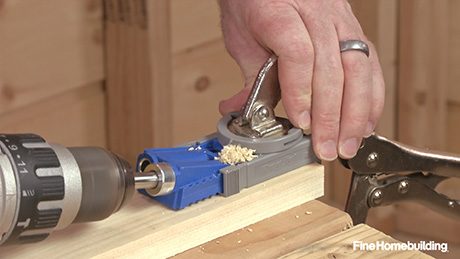
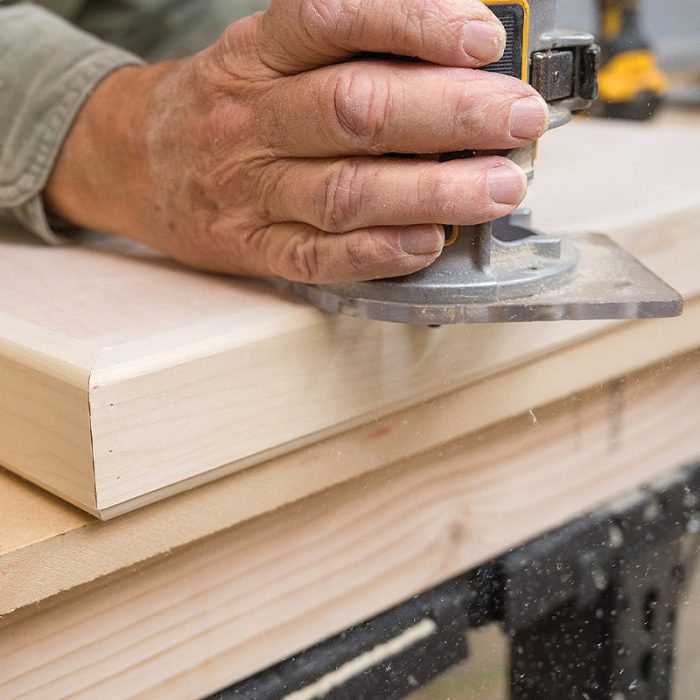
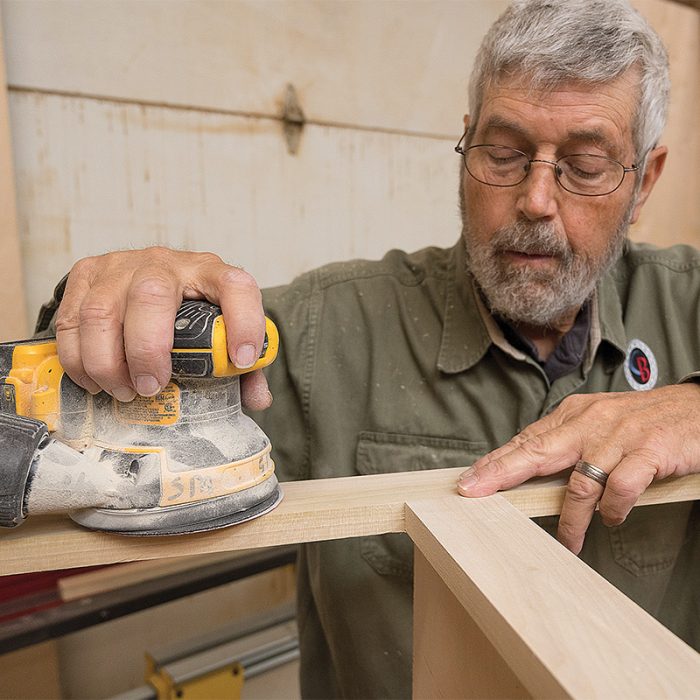
Prep the Plywood: When making tops and shelves, I pass edges that receive nosing over a table-mounted plywood prep bit (collinstools.com). The recess it cuts helps nosing and edgebanding fit tight to the plywood.

Fit the Shelf Front: The shelf nosing is 3/4-in. by 13/4-in. solid poplar. After adding a decorative profile, I cut the pieces to length. Then I glue the nosing to the shelves, leaving it 1/16 in. proud of the top of the shelf for trimming later. I clamp about every 6 in. until the glue sets.
Make it Smooth: After the glue dries, I trim the nosing flush with the top of the shelves using a flush-trim router bit. Then I sand the transition and ease the edge with a 1/4-in. roundover bit.

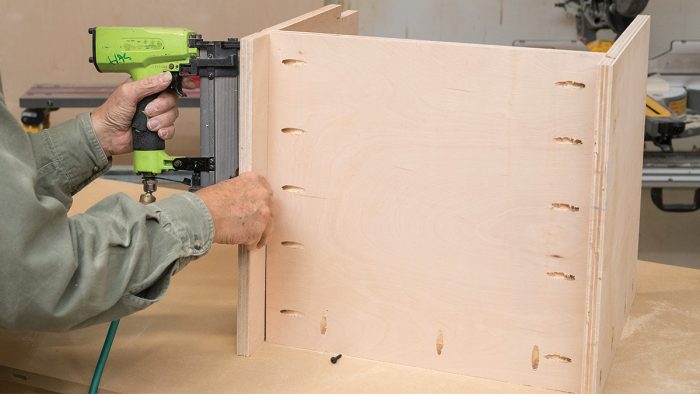
Build the Window Seat

I planned three drawers for this seat, which is approximately 16 in. high, 16 in. deep, and 54 in. wide. A narrower seat might call for two drawers to keep them a usable width. The sides, the drawer dividers that bear directly on the floor, and the continuous stretcher at the back strengthen the seat cabinet, which is sturdy enough to support two people. It’s almost certain that one or two people will stand on the seat when hanging window treatments, so the construction has to be up to the job.

Prep the Panels: The seat cabinet box is 1 in. narrower than its face frame. The three drawers are formed by four 151/4-in.-tall by 15-in.-deep panels. The two end panels have a single 3/4-in.-wide dado to receive the bottom panels. The two center dividers are notched for the stretcher and have dadoes on each side to receive the bottoms. I sand the parts with 100-grit paper before assembly.
Assemble the Box: I use a story pole to find the length of each plywood bottom and to drill pocket holes on their sides and front. I assemble the seat cabinet with the pocket-screw holes facing the floor and fasten the double dadoes last. Waiting until the other elements are assembled keeps the double dadoes as tight as possible.
Add a Stretcher: A full-length stretcher, which fits between the end panels, reinforces the case and provides a surface for screwing the seat cabinet to the wall. Notching the center dividers to fit the stretcher keeps the stretcher in one piece for greater strength.

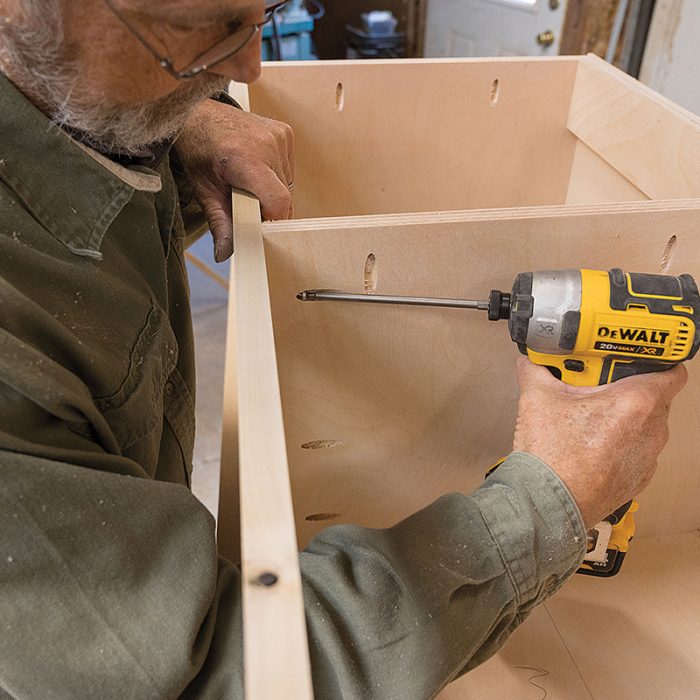
Install the Back: I staple a single piece of 1/4-in.-thick plywood to the back of the seat cabinet with 1/2-in.-crown by 3/8-in.-leg staples. Because the ends of the seat are hidden by the bookshelf cabinets on both ends, the back can be attached without a rabbet or groove.

Make the Face Frame: The seat cabinet’s face frame has two center stiles that cover the interior plywood dividers. I assemble the face frame with pocket screws from the back side.

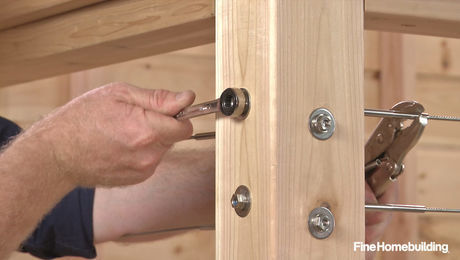
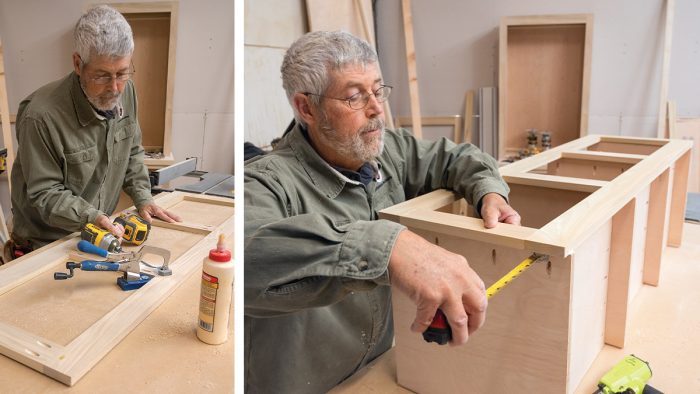
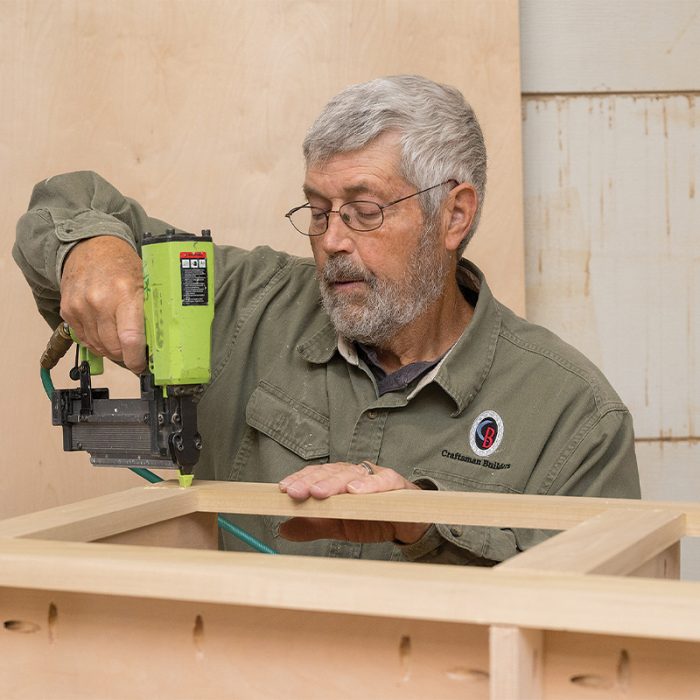
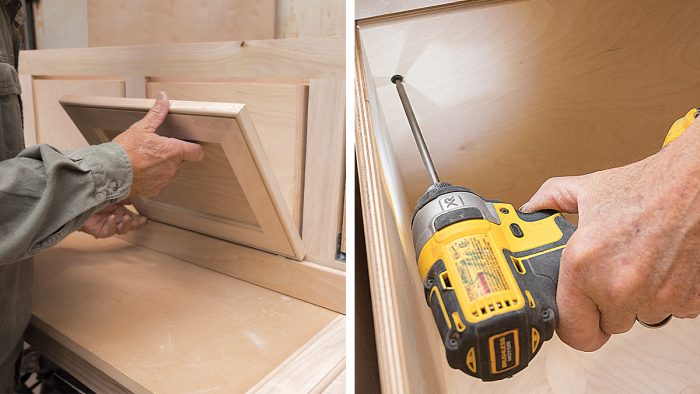
Fasten the Frame: I install the frame with 1/2-in. overhangs on both ends and then fasten it using glue and pocket screws driven into the back of the face frame. I then sand the front of the frame so the stile and rail joints are flush. With the frame complete, I make the drawers using the same methods that I used for making the drawers in the base cabinets (see FHB #332).

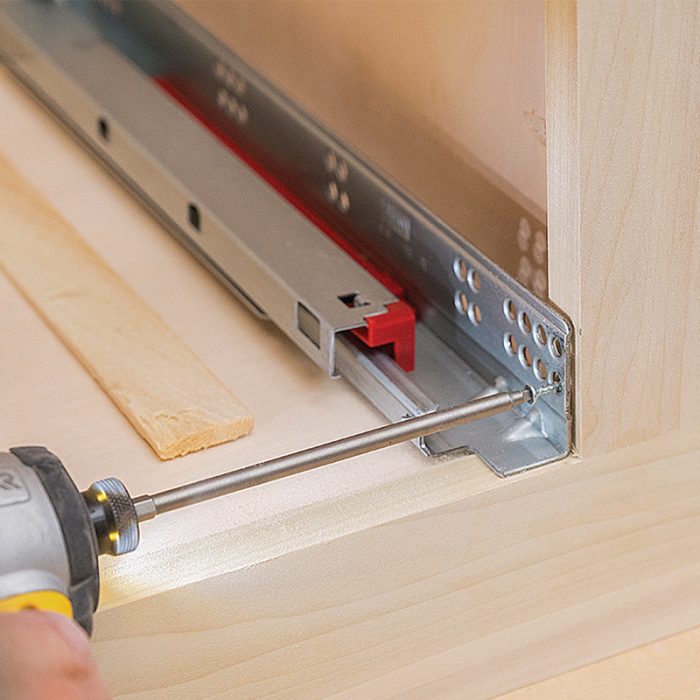
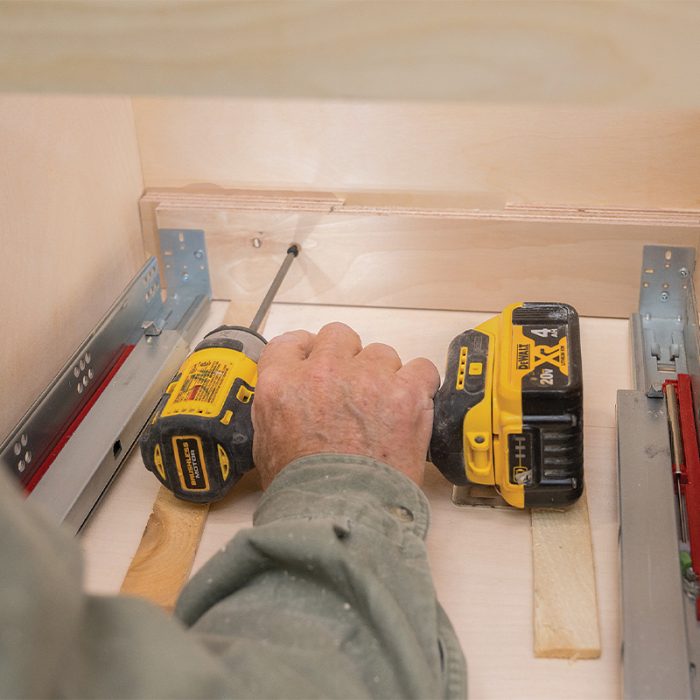
Install Slides: I attach the drawer slides to a piece of plywood, keeping them parallel to the cabinet sides and spaced the width of the drawer box.

Attach Drawer Fronts: Once the drawers are installed and the boxes adjusted for even reveals, I attach decorative fronts to the drawers. The decorative fronts have a plywood panel with a mitered frame. Once they’re aligned, I fasten them from the back with 1-in. screws driven through the drawer box.

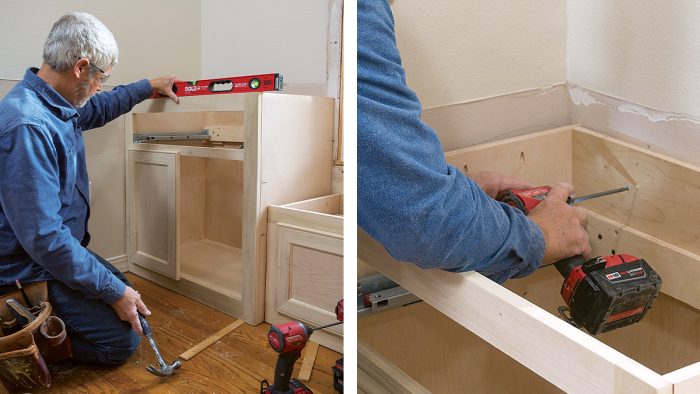
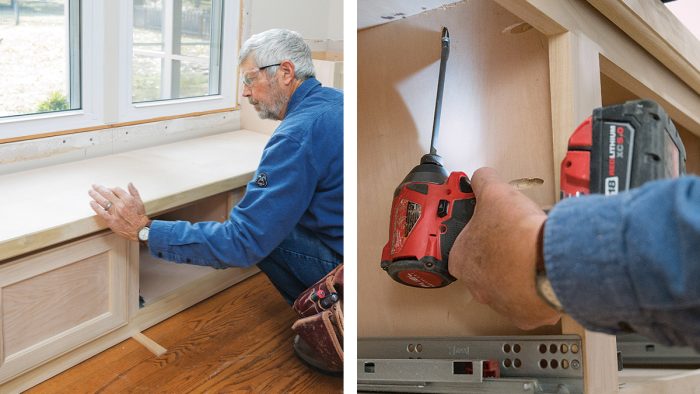
Install the Lower Cabinets

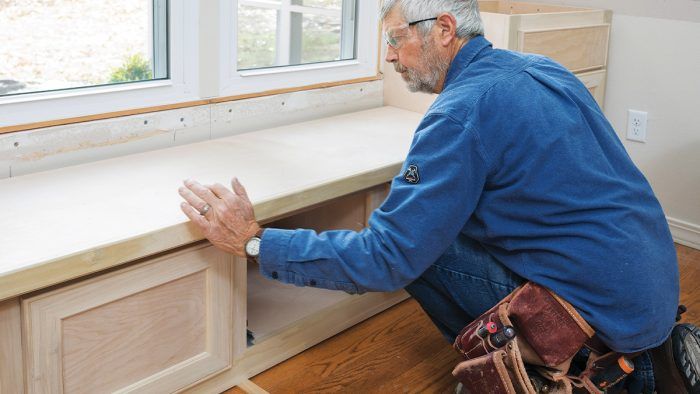
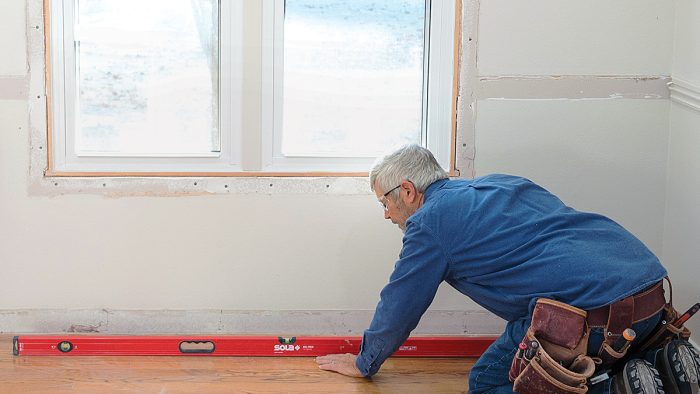
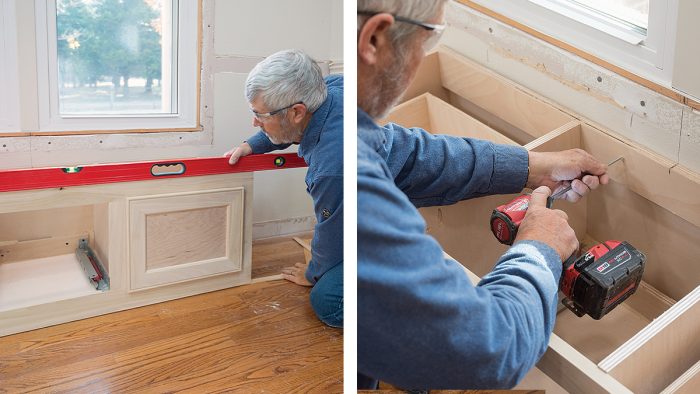
I start the installation by removing the existing base trim, window casing, and chair rail. Next, I install the window seat, centered under the twin window. Its location will determine the layout of the rest of the cabinets. After fitting and fastening the base cabinets, I scribe and fasten the seat top between them.
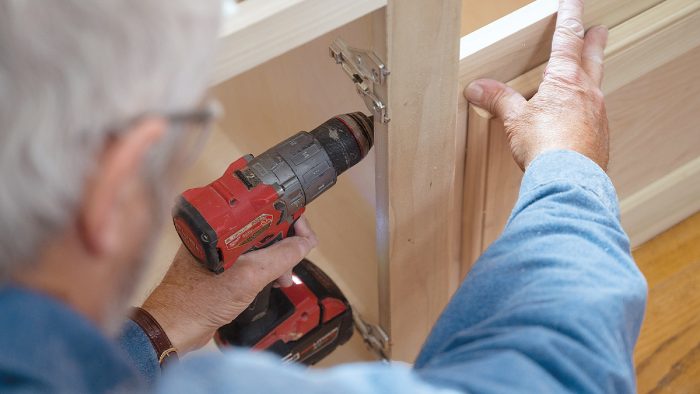
Find the High Spot: I check the floor and determine the high point. From here I measure and mark the cabinet height on the wall. Working in this way allows me to shim cabinets that land on lower places on the floor rather than trim cabinets sitting on higher parts of the floor. This floor was close to level, with a slight high spot near the center.
Fasten the Seat Cabinet: I level the seat cabinet with shims and then fasten it to the wall studs through the stretcher in the back with 3-in. cabinet screws.
Fasten the Base Cabinets: With the seat cabinet shimmed level and fastened, I then fit the base cabinets on both sides of the seat. I scribe the face frames where they meet the walls, leaving a small gap to be caulked later. I shim the cabinets level before screwing them to the wall studs through stretchers in the cabinet backs.
Join the Frames: I drill through the cabinet sides into the window seat face frame to join the two base cabinets to the seat cabinet. After drilling, I drive 2-in. screws to join the cabinets together.
Fit and Fasten the Seat Top: When the two base cabinets are fully fastened, I install the seat top, planing the ends with a power planer as needed for a tight fit. Once I’m happy with the fit, I fasten it from below using pocket screws.

Install the Uppers

After the seat and base cabinets are installed, I fit the upper cabinets. I plane and sand the cabinet face frames to fit tightly to the walls. My goal is a small caulk joint where the cabinets meet the walls. Once everything is installed, I bring in the painter to prep and spray the cabinets.

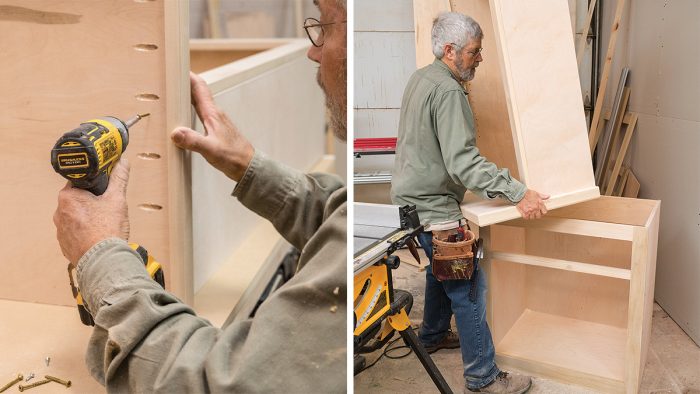
Install the Shelving Units: I place the upper cabinet on top of the base cabinet and check the fit against the adjacent walls. Then I fasten the cabinets to the wall studs through stretchers installed at the tops and bottoms of the cabinets.

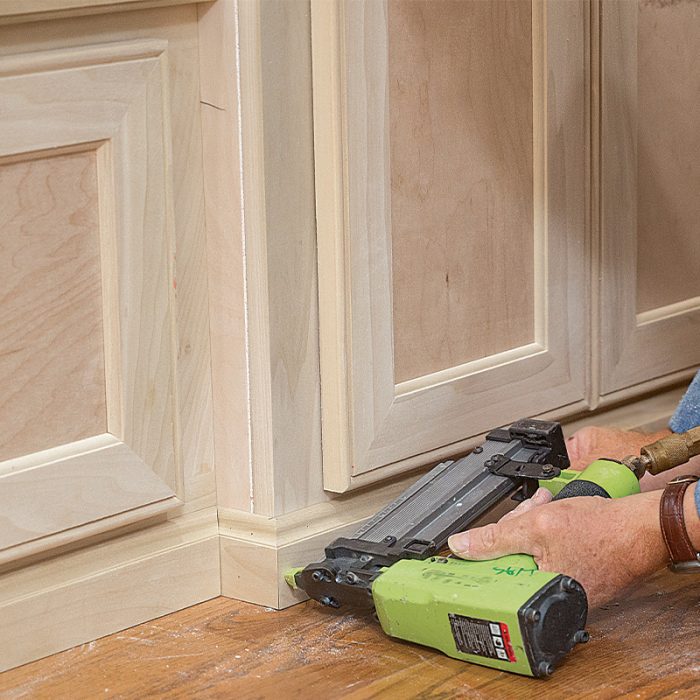
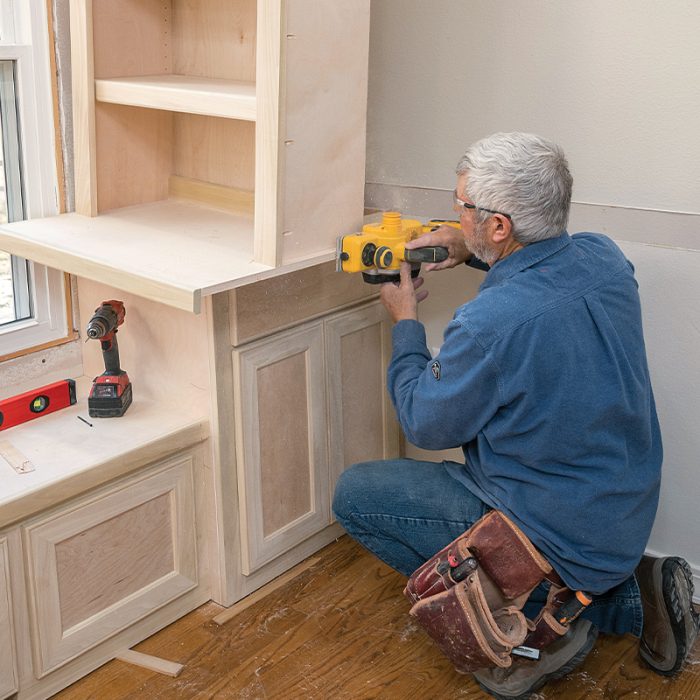
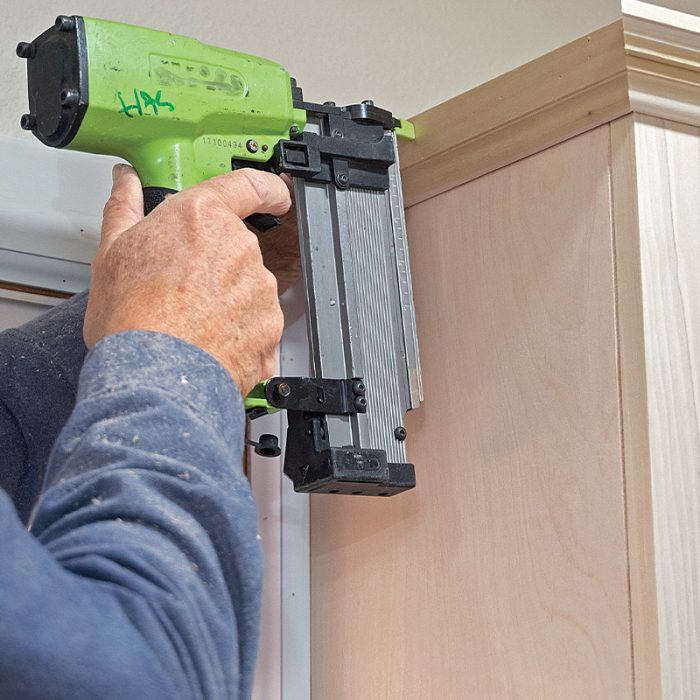
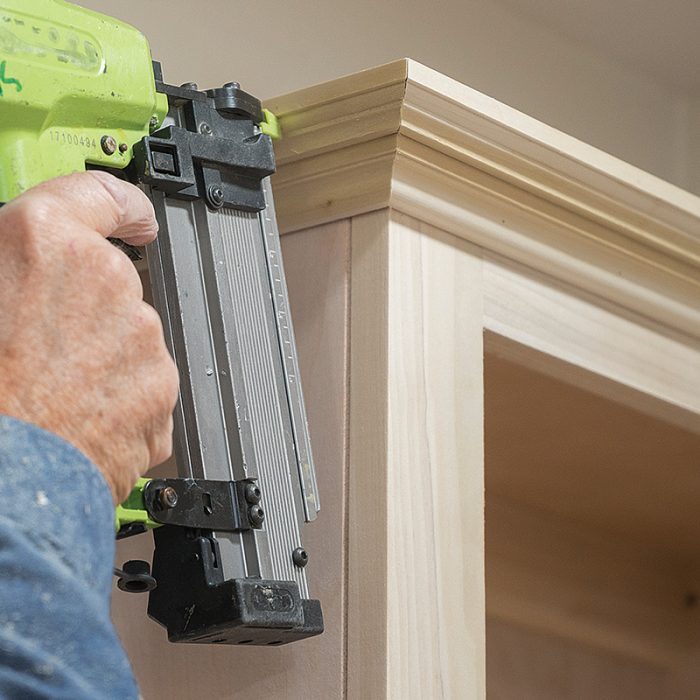
Fit and Fasten Crown: A two-piece poplar crown molding and base trim help give the cabinets and seat their built-in look and feel. I fasten the crown and base with 21-ga. pins, which have holding power near equal to a brad nail but leave a smaller hole. I glue mitered corners to prevent them from opening.

— Gary Striegler; longtime FHB contributor and the owner of Craftsman Builders in Fayetteville, Ark. Photos by Bryan Striegler.

From Fine Homebuilding #333

RELATED STORIES

  • Design Beautiful Window Seats
  • Custom Built-in Cabinets Made Easy
  • An Inside Look at Custom Kitchen Cabinets

Sign up for eletters today and get the latest how-to from Fine Homebuilding, plus special offers.

Signing you up...

This site is protected by reCAPTCHA and the Google Privacy Policy and Terms of Service apply.
See all newsletters
See all newsletters
×

Get home building tips, offers, and expert advice in your inbox

Signing you up...

This site is protected by reCAPTCHA and the Google Privacy Policy and Terms of Service apply.
See all newsletters
See all newsletters

New Feature

Fine Homebuilding Forums

Ask questions, offer advice, and share your work

Log in or create an account to post a comment.

Sign up Log in

Become a member and get full access to FineHomebuilding.com

Up Next

Video Shorts

Featured Story

Rainscreen for Cedar Shingles

Create a crisscross rainscreen with vertical and horizontal furring strips to provide proper drainage, ventilation, and nailing support over continuous insulation.

Featured Video

How to Install Cable Rail Around Wood-Post Corners

Use these tips to keep cables tight and straight for a professional-looking deck-railing job.

Related Stories

  • A Trim Router That Tops Them All
  • Maine Addition
  • Get a Grip
  • Two Ways to Test Windows

Discussion Forum

Recent Posts and Replies

  • |
  • |
  • |
  • |
  • |
  • |
View More Create Post

Highlights

Fine Homebuilding All Access
Fine Homebuilding Podcast
Tool Tech
Plus, get an extra 20% off with code GIFT20

"I have learned so much thanks to the searchable articles on the FHB website. I can confidently say that I expect to be a life-long subscriber." - M.K.

Get home building tips, offers, and expert advice in your inbox

Signing you up...

This site is protected by reCAPTCHA and the Google Privacy Policy and Terms of Service apply.
See all newsletters
See all newsletters

Video

View All Videos
  • Building Custom Kitchen Cabinets
  • Podcast 331: PRO TALK With Cabinetmaker Ben Scott
  • How to Use a Pocket-Hole Jig
  • Podcast 128: Worst. Photo. Shoot. Ever.
View All

Finish Carpentry

View All Finish Carpentry Articles
  • An Easier Method for Mitered Head Casings
  • Installing Prefinished Cabinet Molding
  • Sand Smooth Contours
View All Finish Carpentry Articles

Fine Homebuilding Magazine

  • Issue 333 - August/September 2025
    • A Practical Perfect Wall
    • Landscape Lighting Essentials
    • Repairing a Modern Window Sash
  • Issue 332 - July 2025
    • Custom Built-ins With Job-Site Tools
    • Fight House Fires Through Design
    • Making the Move to Multifamily
  • Issue 331 - June 2025
    • A More Resilient Roof
    • Tool Test: You Need a Drywall Sander
    • Ducted vs. Ductless Heat Pumps
  • Issue 330 - April/May 2025
    • Deck Details for Durability
    • FAQs on HPWHs
    • 10 Tips for a Long-Lasting Paint Job
  • Issue 329 - Feb/Mar 2025
    • Smart Foundation for a Small Addition
    • A Kominka Comes West
    • Making Small Kitchens Work

Fine Home Building

Newsletter Sign-up

  • Fine Homebuilding

    Home building tips, offers, and expert advice in your inbox.

  • Green Building Advisor

    Building science and energy efficiency advice, plus special offers, in your inbox.

  • Old House Journal

    Repair, renovation, and restoration tips, plus special offers, in your inbox.

Signing you up...

This site is protected by reCAPTCHA and the Google Privacy Policy and Terms of Service apply.
See all newsletters

Follow

  • Fine Homebuilding

    Dig into cutting-edge approaches and decades of proven solutions with total access to our experts and tradespeople.

    Start Free Trial Now
    • Facebook
    • Instagram
    • X
    • LinkedIn
  • GBA Prime

    Get instant access to the latest developments in green building, research, and reports from the field.

    Start Free Trial Now
    • Facebook
    • YouTube
  • Old House Journal

    Learn how to restore, repair, update, and decorate your home.

    Subscribe Now
    • Facebook
    • Instagram
    • X

Membership & Magazine

  • Online Archive
  • Start Free Trial
  • Magazine Subscription
  • Magazine Renewal
  • Gift a Subscription
  • Customer Support
  • Privacy Preferences
  • About
  • Contact
  • Advertise
  • Careers
  • Terms of Use
  • Site Map
  • Do not sell or share my information
  • Privacy Policy
  • Accessibility
  • California Privacy Rights

© 2025 Active Interest Media. All rights reserved.

Fine Homebuilding receives a commission for items purchased through links on this site, including Amazon Associates and other affiliate advertising programs.

X
X
This is a dialog window which overlays the main content of the page. The modal window is a 'site map' of the most critical areas of the site. Pressing the Escape (ESC) button will close the modal and bring you back to where you were on the page.

Main Menu

  • How-To
  • Design
  • Tools & Materials
  • Restoration
  • Video
  • Blogs
  • Forum
  • Project Guides
  • Reader Projects
  • Magazine
  • Members
  • FHB House

Podcasts

  • FHB Podcast
  • ProTalk

Webinars

  • Upcoming and On-Demand

Podcasts

  • FHB Podcast
  • ProTalk

Webinars

  • Upcoming and On-Demand

Popular Topics

  • Kitchens
  • Business
  • Bedrooms
  • Roofs
  • Architecture and Design
  • Green Building
  • Decks
  • Framing
  • Safety
  • Remodeling
  • Bathrooms
  • Windows
  • Tilework
  • Ceilings
  • HVAC

Magazine

  • Current Issue
  • Past Issues
  • Magazine Index
  • Subscribe
  • Online Archive
  • Author Guidelines

All Access

  • Member Home
  • Start Free Trial
  • Gift Membership

Online Learning

  • Courses
  • Project Guides
  • Reader Projects
  • Podcast

More

  • FHB Ambassadors
  • FHB House
  • Customer Support

Account

  • Log In
  • Join

Newsletter

Get home building tips, offers, and expert advice in your inbox

Signing you up...

This site is protected by reCAPTCHA and the Google Privacy Policy and Terms of Service apply.
See all newsletters
See all newsletters

Follow

  • X
  • YouTube
  • instagram
  • facebook
  • pinterest
  • Tiktok

Join All Access

Become a member and get instant access to thousands of videos, how-tos, tool reviews, and design features.

Start Your Free Trial

Subscribe

FHB Magazine

Start your subscription today and save up to 81%

Subscribe

We hope you’ve enjoyed your free articles. To keep reading, become a member today.

Get complete site access to expert advice, how-to videos, Code Check, and more, plus the print magazine.

Start your FREE trial

Already a member? Log in