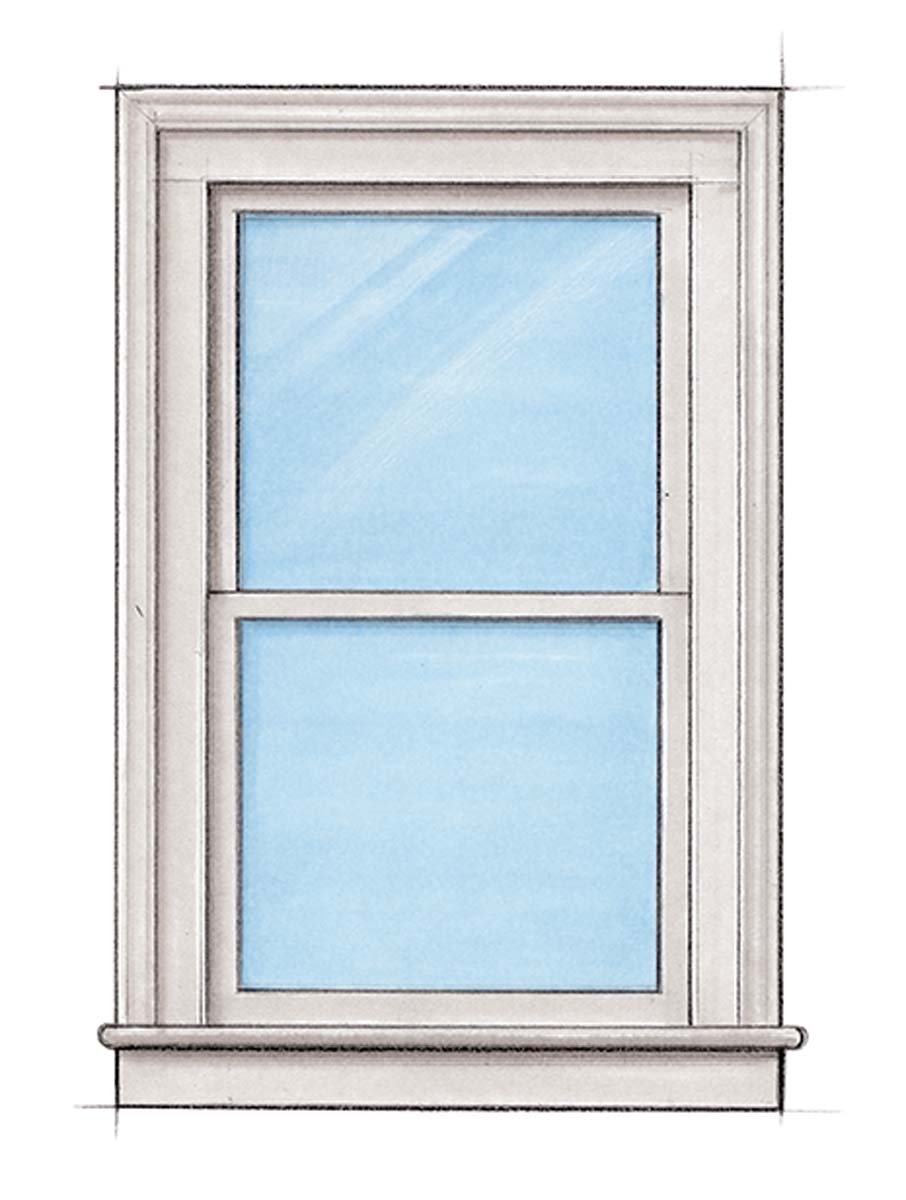
New Life for Old Double-Hung Windows
With new weatherstripping, weights, pulleys, and ropes, you can improve performance without compromising historical authenticity.
Synopsis: There’s a good reason why traditional double-hung windows have long lives: They use a simple layout and have basic operation. Even the best old windows can use a little help, though. New Orleans restoration carpenter John Michael Davis describes his methods for upgrading traditional double-hung windows to make them energy-efficient and smooth while also keeping them historically authentic. Davis begins by disassembling the windows; repairing and/or upgrading parts; sealing gaps to halt air leaks; then tuning up the channels, weights, ropes, and pulleys.
Magazine Extra: View a photo essay where Davis shows you how to fit new sashes into old jambs.
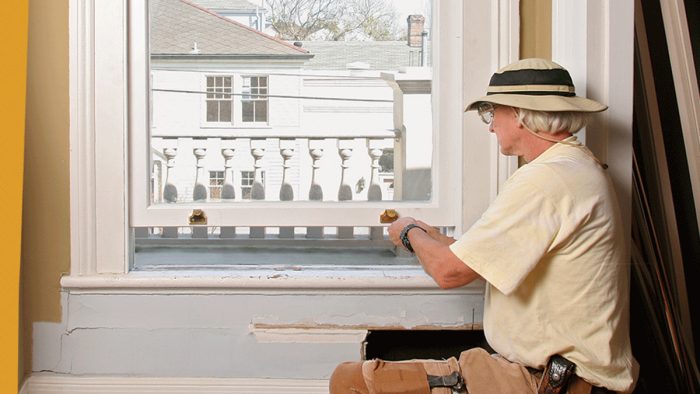
A client recently complained to me about how badly the old windows rattled in his historic home. He wanted to stop the noise as well as the air infiltration, but he didn’t want me to replace the windows. Like me, my client understands the important role that original windows play in preserving an older home’s historical integrity.
As a carpenter who specializes in restoration projects in New Orleans, I’ve come to appreciate not just the beauty of old windows but also their solid construction. All the sashes I see are made from locally milled cypress, a wood that has long been prized for its strength, its workability, and its rot-resistant qualities: ideal characteristics in this hot, wet climate. With the resources available today, boosting the efficiency of old sashes doesn’t mean tearing them out or painting them shut. You can have smooth-working windows original to the house that don’t rattle in the wind or make you dread next month’s energy bill.
Old Sashes Work Better
Most people who want to address the issue of leaky windows tend to have a knee-jerk reaction: Either install storm units over the existing window opening, or remove the old sashes in favor of replacement windows (new units that insert in the old jambs). While storm windows can be installed to look unobtrusive, they are a pain to operate. To me, the much-more-expensive method of installing replacement-window units also has disadvantages. For starters, many of them don’t come close to operating as effortlessly as old sashes hung with counterbalanced weights. Unlike the pulley-and-counterweight system, which has few working parts, replacement windows contain many pieces that can break down over time, resulting in operation that deteriorates with age.
As an alternative course, I prefer to keep as many of the existing elements that make old houses unique and historical as possible, including the windows. Because windows have such a large impact on a house’s appearance, updating them with new technology that doesn’t detract from historical aesthetics is a far better (and more environmentally responsible) option.
My process involves removing the sashes from the opening, but it is far cheaper in the long run than the aforementioned alternatives. When upgrading windows, I usually repair damage to sashes, casings, jambs, and sills rather than replace them. Even highly durable cypress can fail in spots, rather than wholesale like lesser woods; repaired cypress will still be better than most any new wood everywhere else. I use two-part epoxy putties, adhesives, and special coatings to repair and protect these pieces.
The channel that the sashes move in should be tough but slippery. I coat the channel with DuPont Imron (www.dupont.com) two-part polyurethane over DuPont’s Corlar epoxy enamel. These products are available only through industrial suppliers.
I don’t use double-insulated glass for the new sashes I have made or update the glass of an original sash. If the sashes are single lite, the additional complication of modifying the sash to accommodate the thicker glass and the cost of ordering specially sized pieces (which can’t be trimmed easily if they don’t fit properly) might be justified in some harsh climates and with large budgets. To me, it seems a poor return on investment in this wet climate. Such a lite would also add a lot of weight to the sash, perhaps making it harder to operate, and it would definitely send you out looking for much-heavier counterbalancing weights if you already had existing ones.
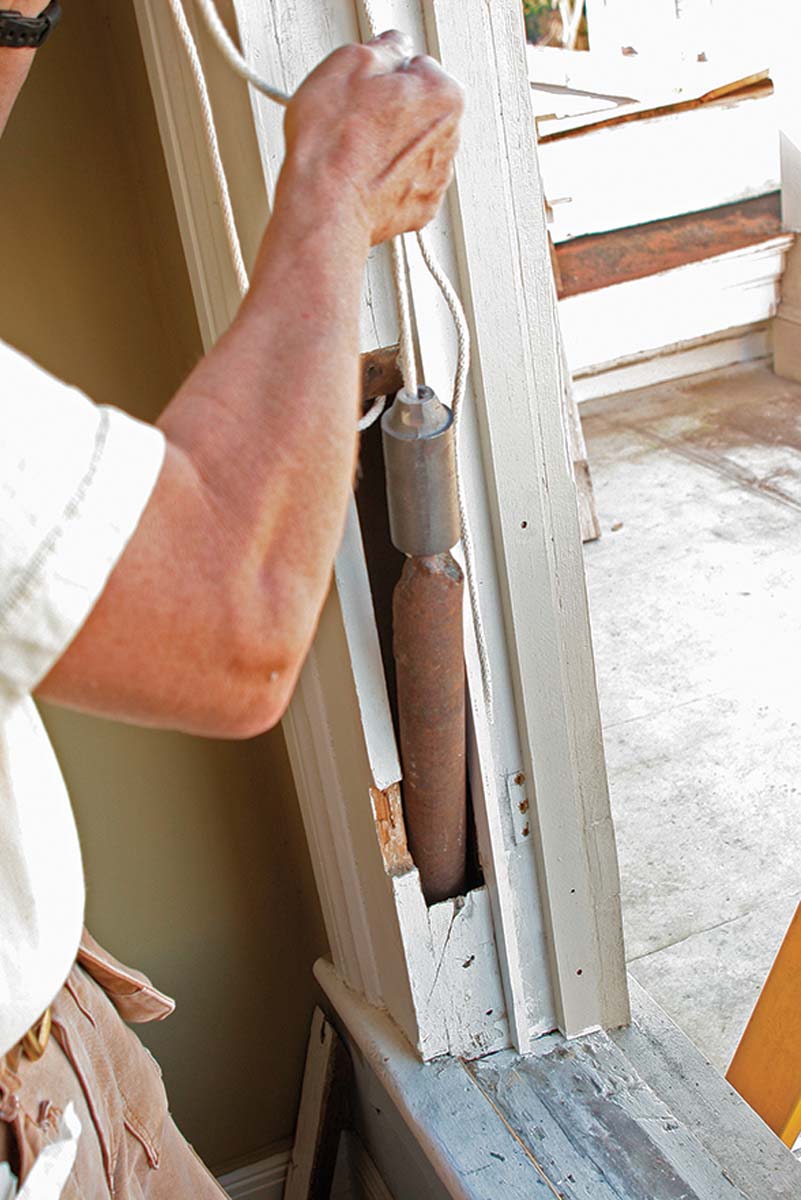
If sash weights are missing, there is an added challenge. With the retrofit project featured here, we were replacing badly done casement windows that had replaced the original double-hung sashes, and the weights were long gone. The homeowner weighed the lower sashes and bought approximate matching weights from local architectural salvage yards. New 11⁄2-lb. and 2-lb. helper weights were ordered from Architectural Iron Co. (www.architecturaliron.com) to enable the proper balance to be set. I’ve heard of several methods for calculating sash weights, but a cast-iron slug half the weight of the sash on each side gets you close. From there, you can fine-tune the balance until the sash stays in position and also works with minimal effort.
The largest benefit of upgrading old windows comes from modern weatherseals. The system I use is from Resource Conservation Technology (www.conservationtechnology.com), which has seals for just about any situation. These seals stop air infiltration and also aid in operating the sashes because they reduce the friction caused by two painted surfaces rubbing against each other. Getting smooth plastic to slide on a painted surface is a huge improvement over having a painted surface slide on another painted surface. Painting the other wear surfaces with a high-gloss enamel is another big improvement.
Sash-Weight Cavities Can Be Insulated
During home restorations, it’s sometimes necessary to remove the interior casing, which in turn fully exposes the window-weight cavity. If the rest of the house is to be insulated, as is usually the case, insulating the weight cavity is worth the effort.
In circumstances when a previously functioning upper sash is going to be permanently fixed, removing the outer set of weights frees space behind the exterior casing for rigid-foam insulation. I’ve heard of a technique in which the weight is placed inside a PVC pipe, with the pipe foamed into place. Whatever insulation method is used, it’s important to maintain access to the weight through the jamb trap door and to be absolutely certain that the pocket can’t move at any time in the future. I never permanently remove weights from a pocket, even if they are not being used. In the future, someone might want to restore a window’s full function. Having the weights there to do it would be priceless.
With all this work and relatively inexpensive materials, you end up with windows looking the way they did 150 years ago. But more important, perhaps, is that they are as weathertight as anything being made today, and more durable. They can be operated easily with two fingers, and instead of looking gauche, with cheap and tricky details, the redone units have the look of quality. A lot of times, quality is defined most emphatically by what you don’t see.
Simple Function, Easy To Disassemble
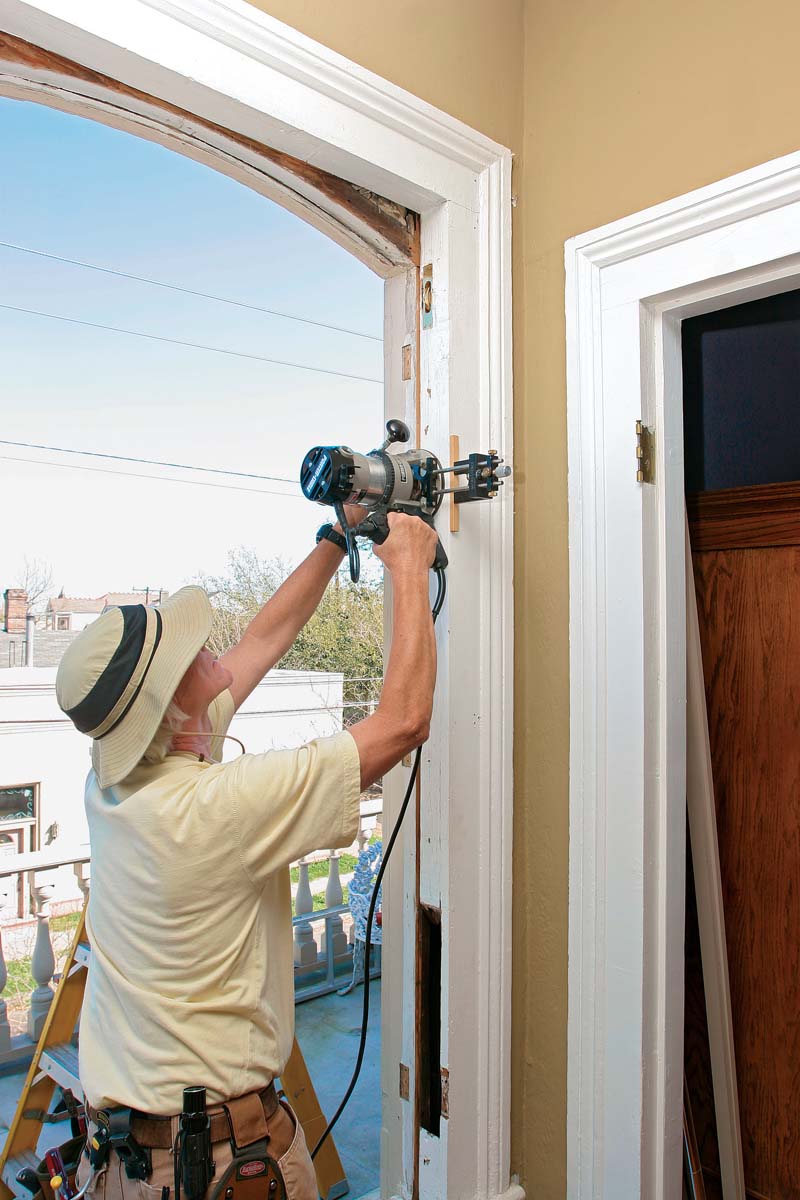
Traditional double-hung windows have a simple layout and basic operation. That’s why many windows still work after more than 150 years of use. Each sash rides within a channel created by a stop and a parting bead. A sash cord or chain attached on each side of the sash edge carries counterbalance weights. To weatherize and update the window properly, it’s necessary to remove the sashes from the window jamb. Here’s how to do it.
|
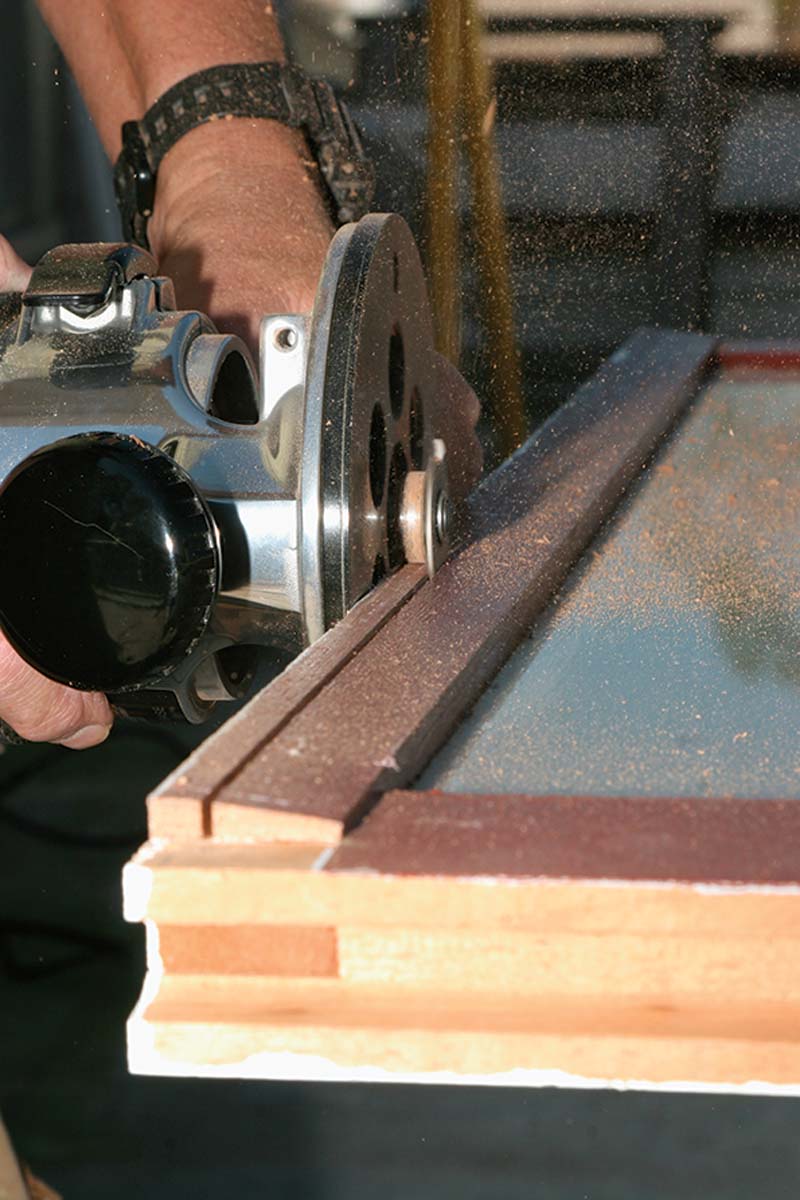
Step One: Remove The Stops Remove the interior stop first. Use a utility knife to break the seal between the stop and the casing. This piece keeps the lower sash in place and is generally nailed or screwed to the jamb and casing. It’s necessary to remove the stop from only one side. Once removed, tip out the lower sash, and disengage the sash cord or chain. To take out the upper sash, remove the parting bead, a thin strip of wood that sits in a groove between the upper and lower sash. If it’s the original bead, it will likely need to come out in pieces. A router equipped with a straight-cutting bit and an edge guide cleans up the parting-bead channel for a new parting bead. Skip this step if the upper sash will remain fixed. |
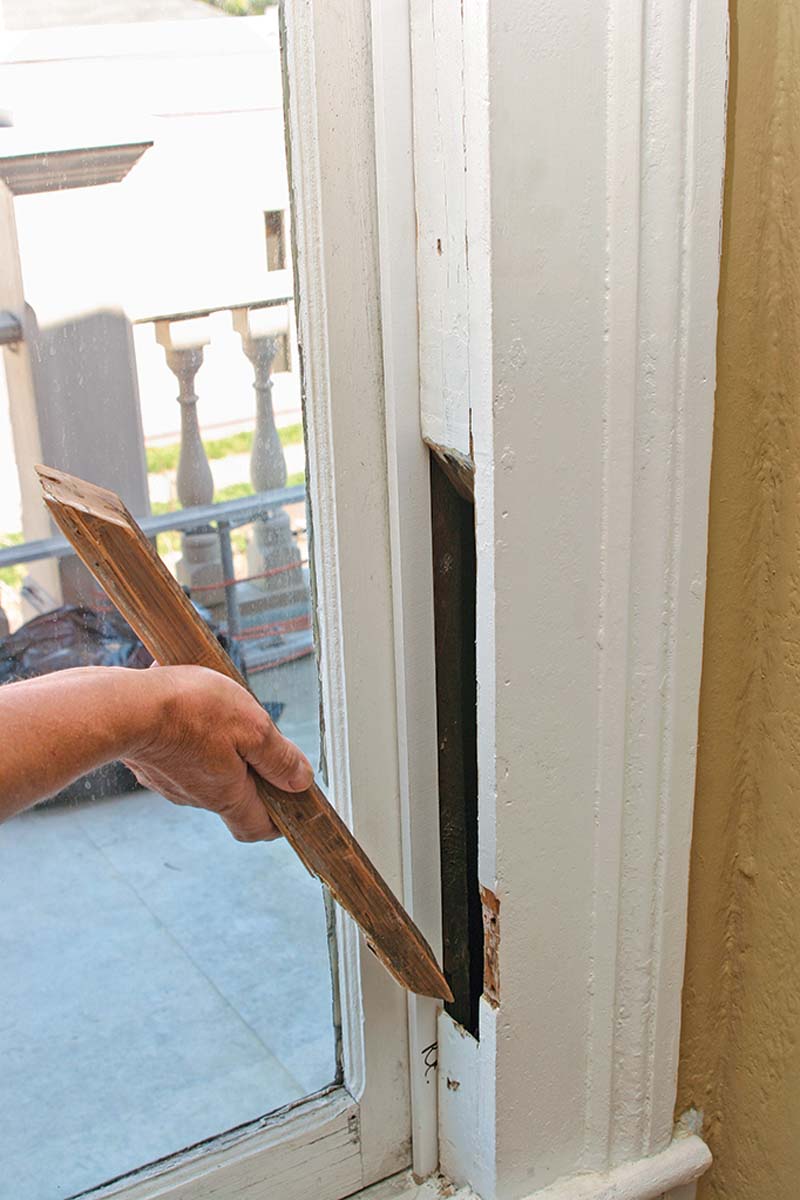
Step Two: Remove The Weights A pair of sash weights, sized to counterbalance the weight of the sash, allow the sash to be raised and lowered to any position. The weights are attached to the sash with sash cord or chain that rides over a pulley installed near the top of the side jamb. Access to the weight is gained through a small access panel in each side jamb. This panel typically is held in place with two screws. To make removing the panel easier, run a drywall screw in the middle of the panel to act as a handle before removing it. |
 |
 |
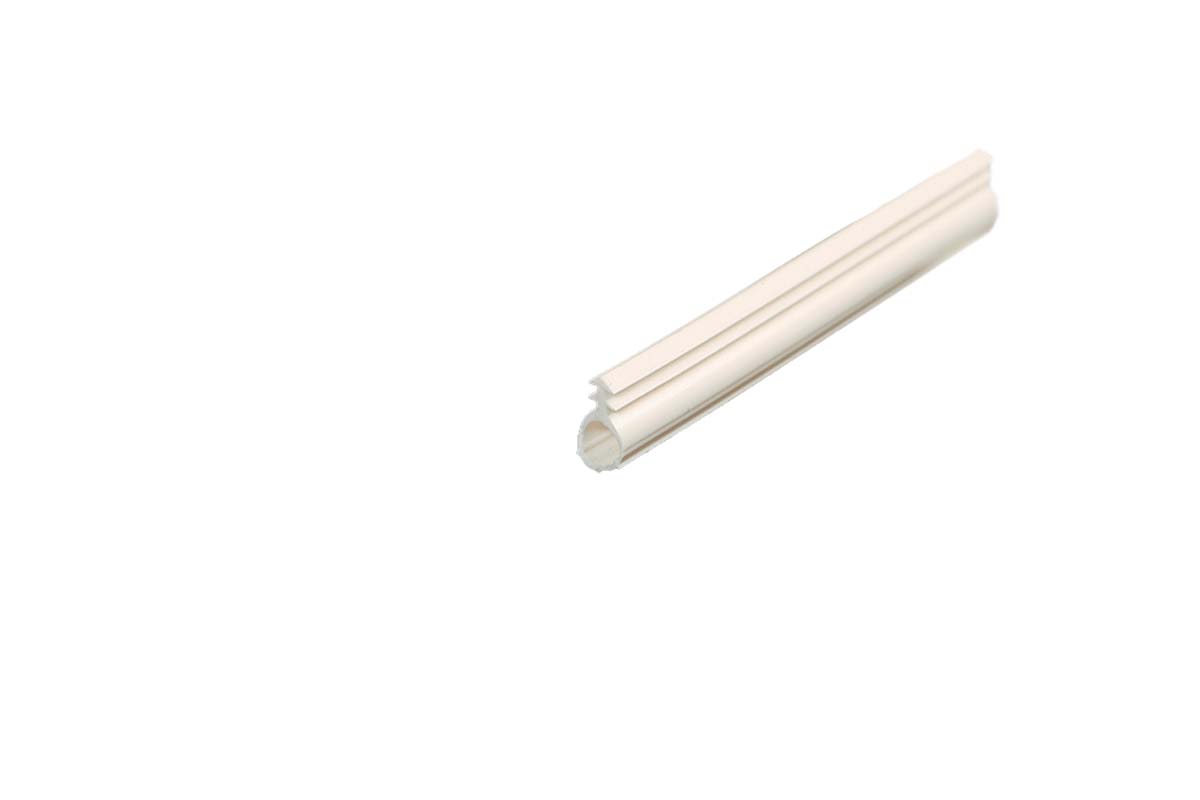
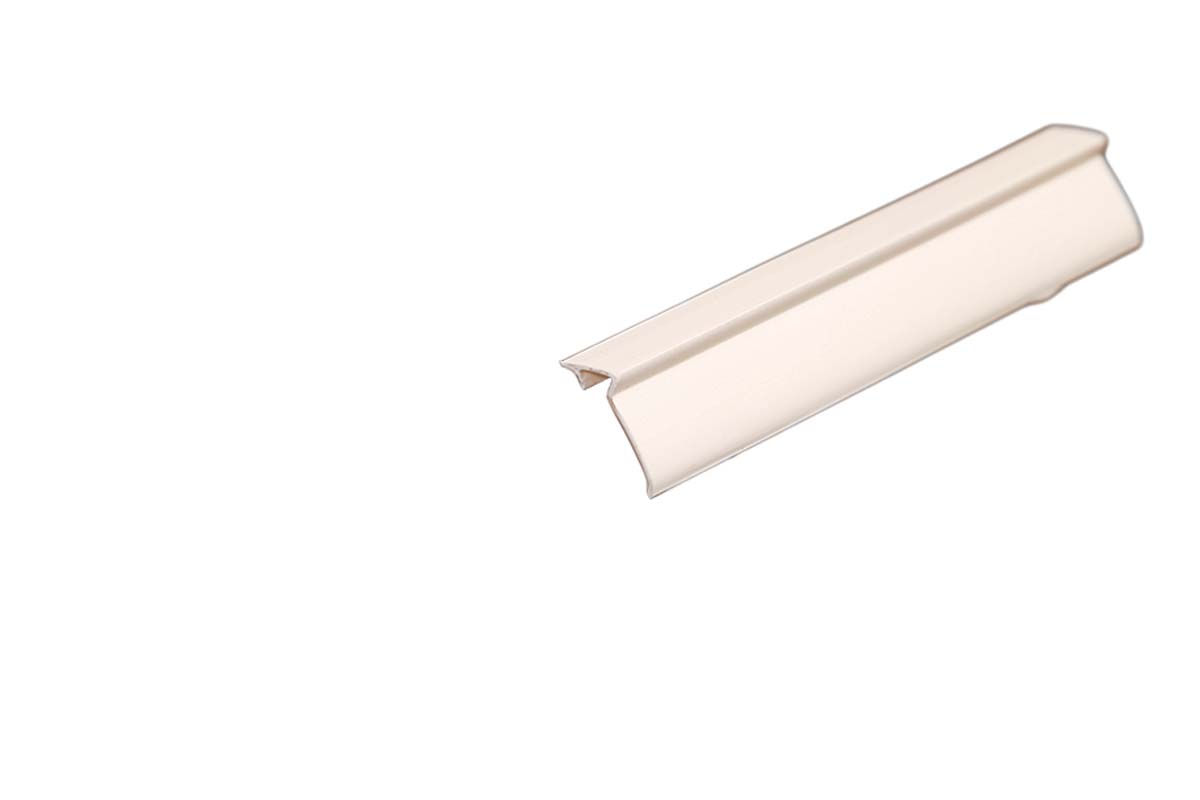
Stop Air At These Three Places
Add leaf seals and a tube seal around the sash. The profiles shown below can be installed so that they are inconspicuous; they will maintain the window’s original appearance (see p. 78).
|
1.Use at the meeting rails, where the top rail of the lower sash meets the bottom rail of the upper sash. |
2.Use where the lower sash meets the sill. If the upper sash is not fixed, use where the upper sash meets the head jamb. |
3.Use along both vertical edges of the sash, where the sash contacts the window jamb. |
 |
 |
 |
Seal Gaps Around The Sash To Stop Air Leaks
 I use leaf seals and tube seals from Resource Conservation Technology (www.conservationtechnology.com) around all the working sashes. Slippery, flexible, and durable, leaf seals not only stop undesirable air movement, but they also help sashes to move more easily. The seals are installed in a groove cut in the sash. Because I bought in bulk, the price of materials to complete each window came to less than $10 for the seals I used. Once I was set up to work, I could fully gasket each window in about two hours. RCT offers variations of the seals mentioned below, so determine the needs for your project before ordering. If I’m permanently securing an upper sash, I run trim screws through the stiles, filling in gaps around the sash with backer rod as necessary, followed by paintable polyurethane caulk.
|
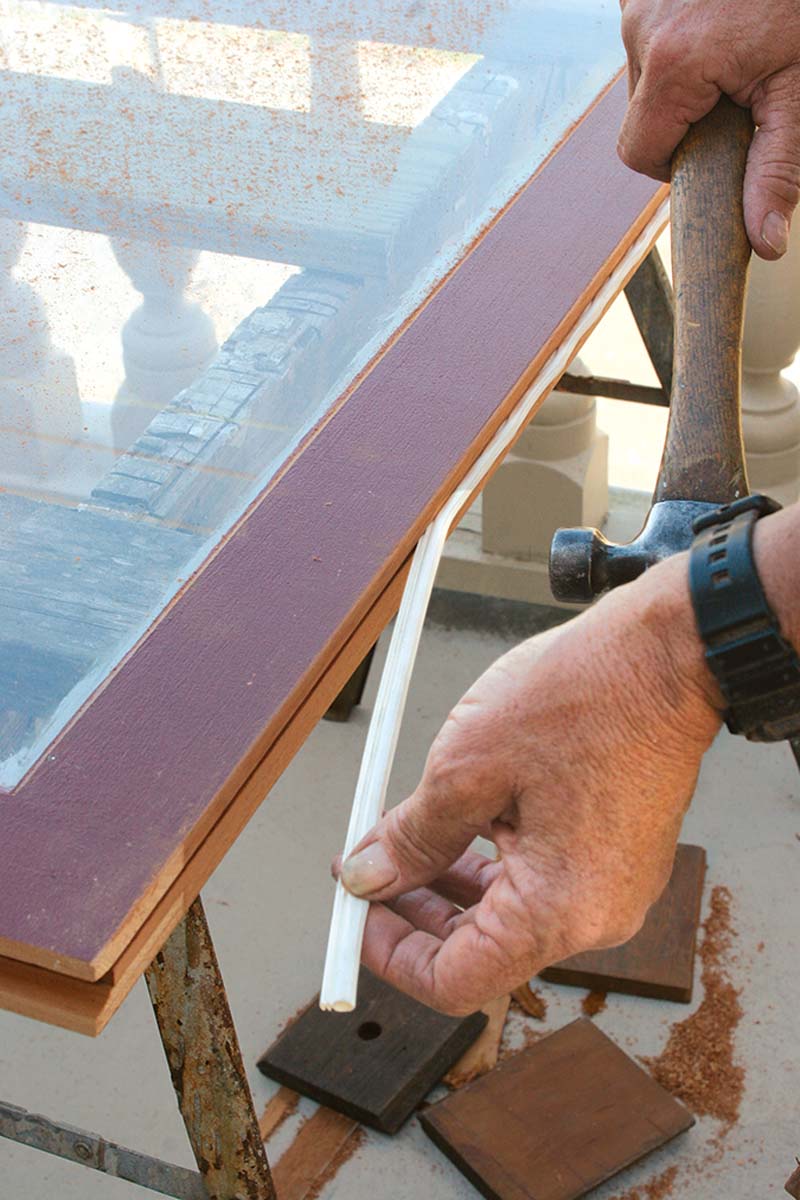
Where The Two Sashes Meet Cut a groove along the meeting rail of the lower sash using a slot-cutting bit in a router. Insert the WS87, an offset plastic leaf seal, into the groove to eliminate the gap between the meeting rails. If the leaf seal catches on the sash locks when the sash is raised, carve out a half-round piece of the seal for clearance. Available from Resource Conservation Technology for $36, the 2mm by 8mm WS90 slot-cutting bit creates the exact groove required for this weatherseal. |
 |
|
Where The Sash Meets The Sill After routing a groove along the bottom rail, tap WS10 tube seal into the groove with a hammer. Move across the sash only an inch or two at a time, and don’t stretch the tube seal as you go. Be sure that the tube seal won’t overcompress once the sash lock is engaged. To avoid overcompression, you might need to trim the bottom of the sash or run the seal in a dado cut in the rail. This approach is useful if the gap across the rail is not uniform. Refer to manufacturer’s specifications for tolerances. |
 |
|
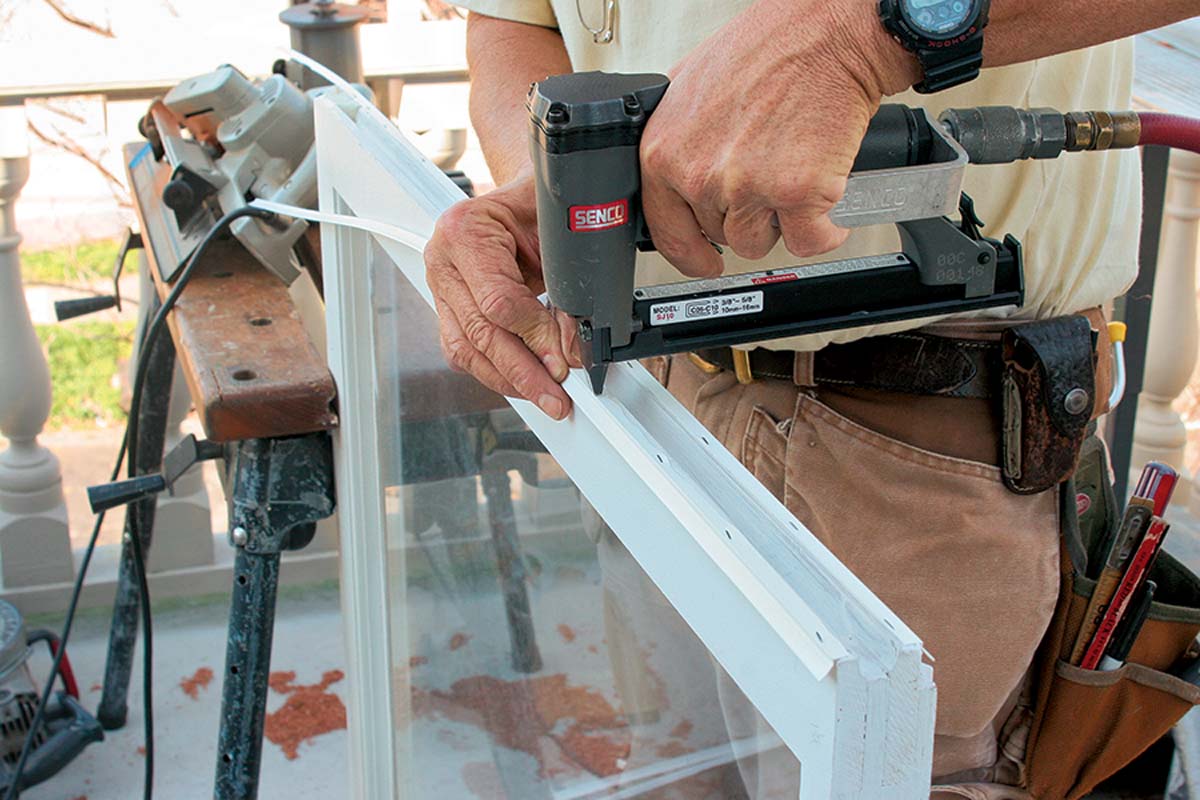
On The Outer Edges Of The Sash Stiles For this project, I cut the mounting “arrow” off the seal and attached it to the sash with stainless-steel staples. Like all RCT’s seals, the WS84, which I used here, is designed to sit in a groove. While this is usually a good approach, it did not work for this application. The wide rope channel left little “meat” along the stiles to run the groove, and the seal would have stood proud of the interior stop, which my client did not want. |
 |
Tune Up The Channels, Weights, Rope, And Pulleys
|
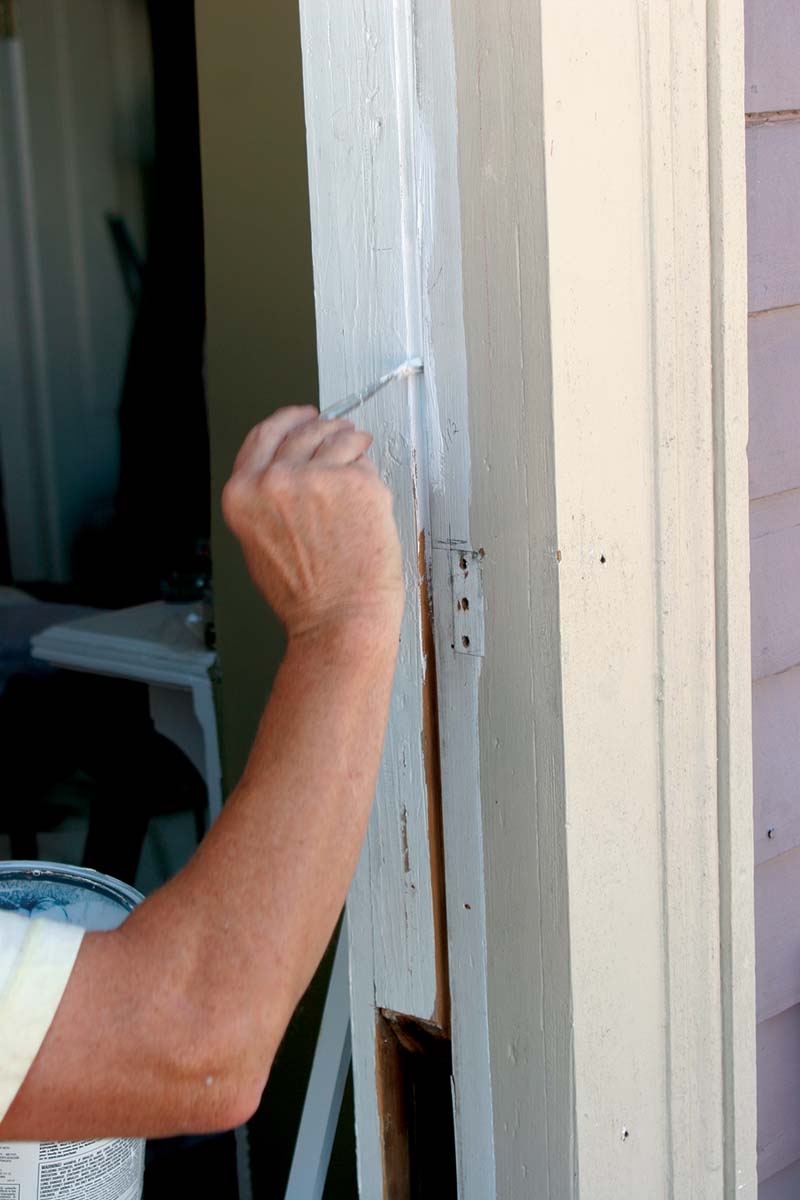
Prime All Bare Wood Before reinstalling the sashes, I sand the jambs smooth, then prime and paint them to create a tough, slippery surface. I like DuPont’s Corlar and Imron products, but they are available only through industrial suppliers. As an alternative, a high-gloss marine enamel works well. |
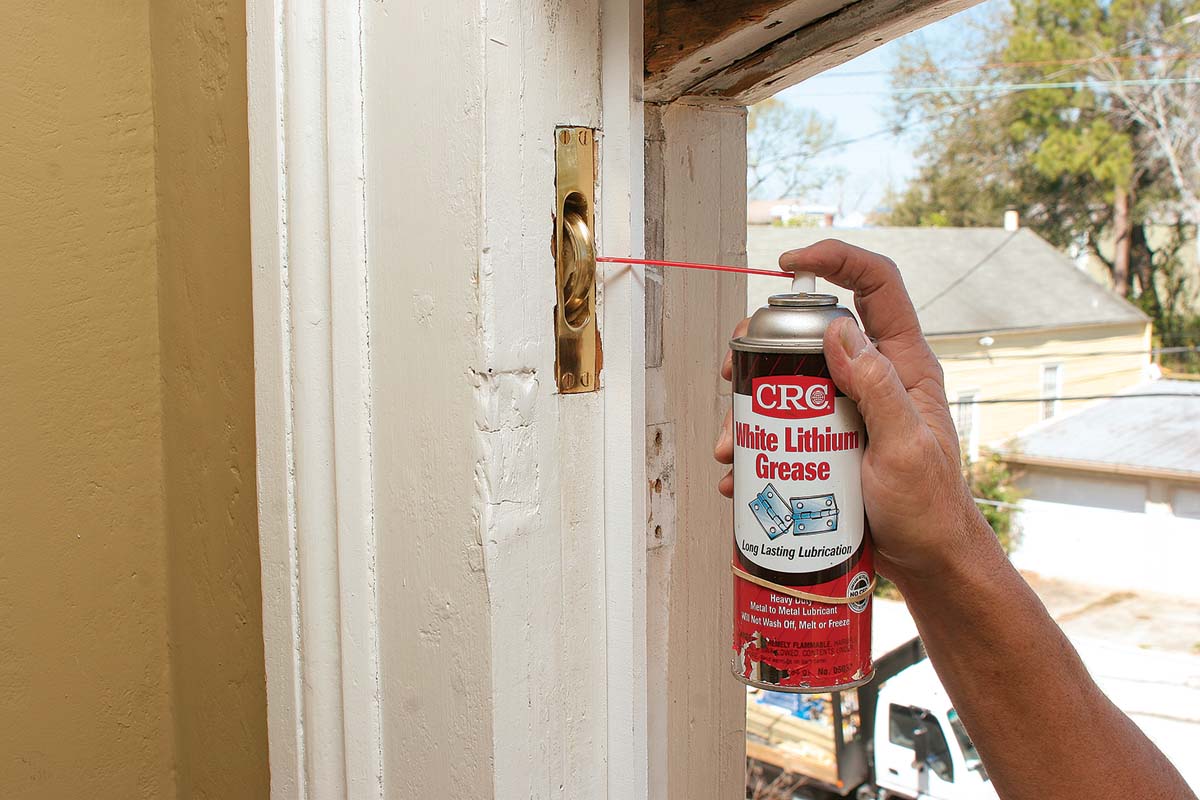
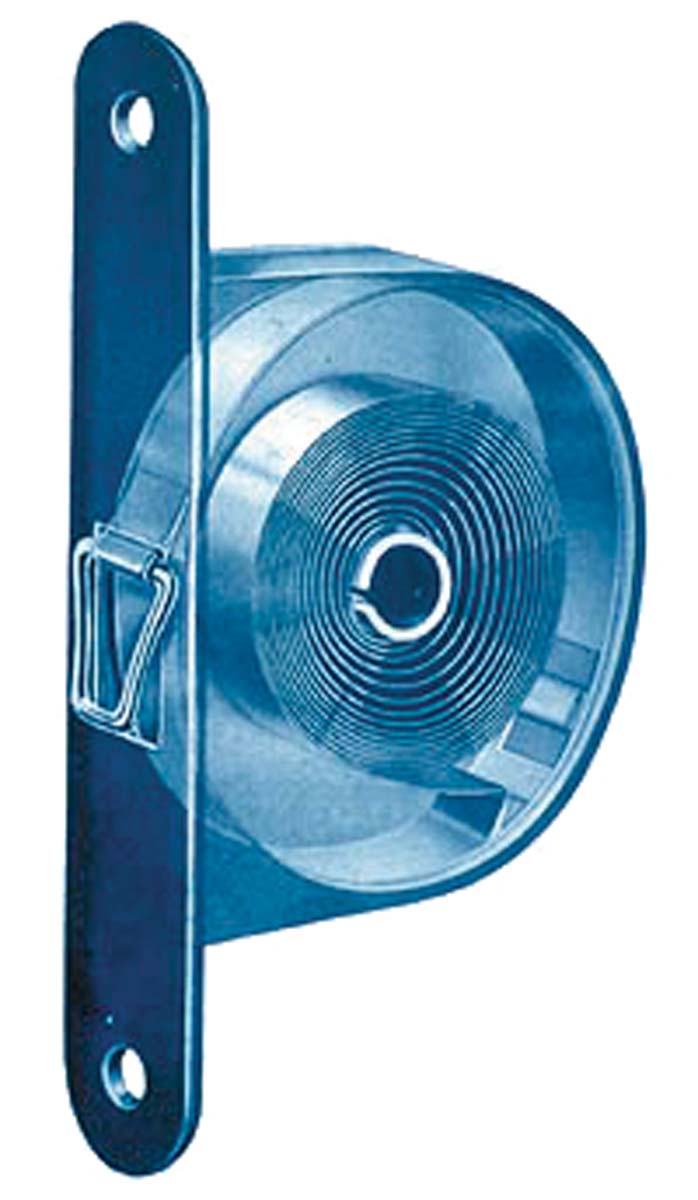
Lubricate The Pulleys Before reinstalling the ropes and weights, spray a lubricant into the housing onto the spindle/wheel center while you spin the wheel. Replace damaged pulleys with new ones. The one shown here from Van Dyke’s Restorers ($15.99; www.vandykes.com) includes nylon spindle bushings, which make for smooth operation. |
 |
 |
|
Put The Weights Back Before The Sashes Because the weights I had weren’t heavy enough, I added supplemental weights. The weights slip onto the sash cord and can be stacked on top of the main weights, as well as each other (2 lb. for $12; www.architecturaliron.com). Once the weights are installed, I replace the access door to seal the side jamb. |
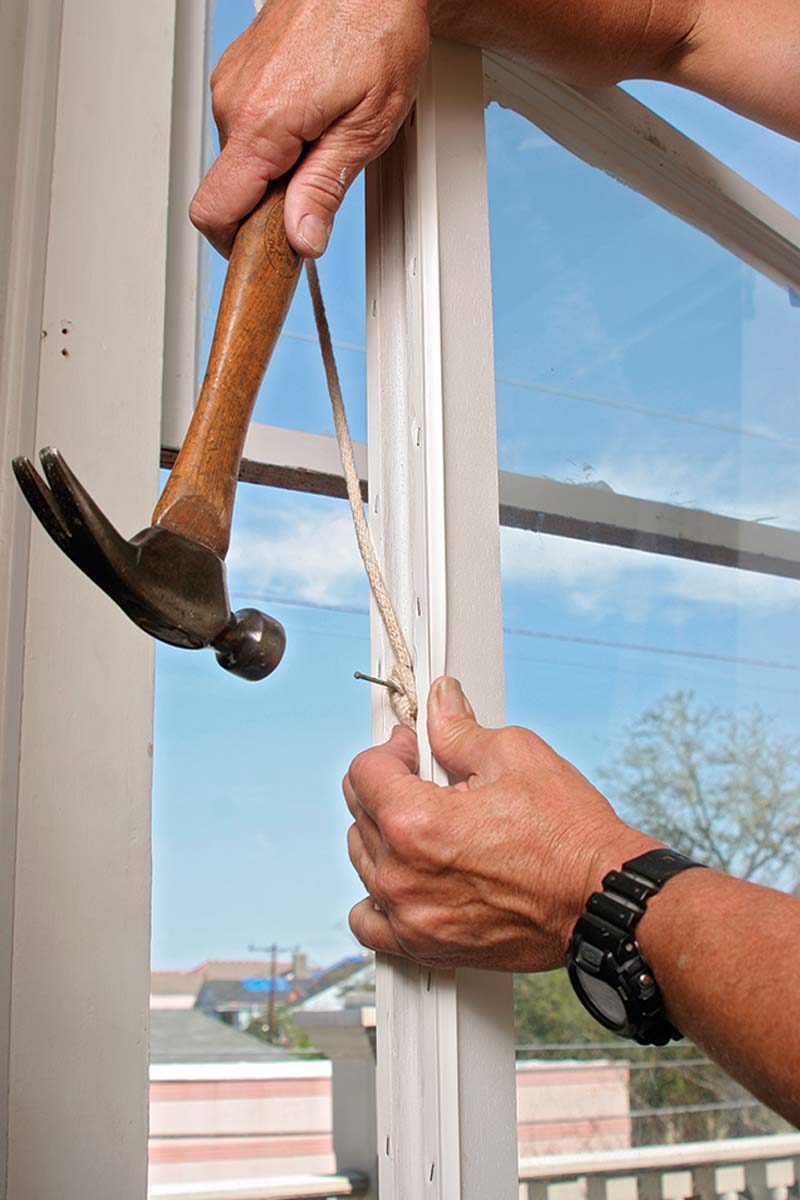
A Knot And A Finish Nail Do The Trick A knot at the end of the sash cord sits in a hole in the sash stile. For extra hold, I run a finish nail through the knot. I bend the remaining length of nail over the knot to push the knot into the channel so that it won’t rub on the side jambs. |
 |
 |
No Weight Pocket, No Problem
|
If the weight pocket never existed or if you choose to fill one with insulation, tape balances made by Pullman ($24 each; www.pullmanbalances.com) are a good option. They operate much like a tape measure, providing the same counterbalance function as a traditional pulley, rope, and weight system. Once mortised into the side jamb and screwed in place, the tape is attached to the sash edge with a panhead screw and a washer. These tapes require only a shallow dado and a mounting pocket in the sash edges, but mounting them on your own can be tricky because the tension spring is incredibly strong. |
 |
For more photos, drawings, and details, click the View PDF button below: